
PostgreSQL의 주요 설치 방법에는 다음의 3가지가 있습니다. 이 글에서는 3번째 “PostgreSQL 개발자 Yum 리포지토리에서 설치“하는 방법에 대해 소개 하겠습니다. *(리포지토리는 패키지 저장소를 의미합니다.)
- 소스 코드를 컴파일&설치
- 소스 코드를 컴파일&설치하는 방법은 최신 버전을 사용할 수 있지만 먼저 컴파일 환경을 구축하거나 업그레이드 할 때마다 컴파일&설치를 해야하는데 이는 너무나 시간이 걸립니다.
- Redhat 또는 CentOS 표준 Yum 리포지토리에서 설치
- Redhat 또는 CentOS 표준 Yum 리포지토리를 사용하는 방법은 바로 설치 할 수 있고, 시간이 들지 않지만 최신 버전을 사용할 수 없습니다.
- PostgreSQL 개발자 Yum 리포지토리에서 설치
- PostgreSQL 개발자의 Yum 리포지토리를 사용 설치한다면 그다지 시간이 걸리지 않고 최신 버전을 사용할 수 있습니다.
사용 가능한 리포지토리를 확인하기
다음과 같이 “sudo yum repolist enabled” 명령으로 내용을 확인 할 수 있습니다. 확인 결과 CentOS7 인스톨 직후는 Base, Extras, Updates 3개의 리포지토리만 사용 가능한 상태입니다. 참고로 “sudo yum repolist all“의 결과는 여기를 눌러 확인하십시오.
$ sudo yum repolist enabled
repo id            repo name           status
base/7/x86_64      CentOS-7 - Base     10,072
extras/7/x86_64    CentOS-7 - Extras      476
updates/7/x86_64   CentOS-7 - Updates   2,189
repolist: 12,737
리포지토리에 대해 더 자세히 알고 싶으시다면 yum 리포지토리 활성/비활성 확인하기 를 참조하십시오.
PostgreSQL Yum Repository설치
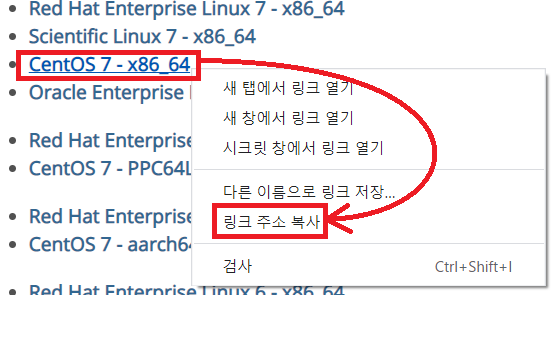
PostgreSQL RPM Building Project – Repository Packages
위 페이지에서 다음 화면과 같이 설치 대상 OS(Linux Distribution) 즉, 여기서는 “CentOS 7 – x86_64에서 마우스 오른쪽 버튼 클릭” > “컨텍스트 메뉴 표시” > “링크 주소 복사” 순서로 PostgreSQL 개발자의 Yum 리포지토리 URL을 복사합니다.
https://yum.postgresql.org/repopackages.php
취득한 URL은 다음과 같습니다.
https://download.postgresql.org/pub/repos/yum/reporpms/EL-7-x86_64/pgdg-redhat-repo-latest.noarch.rpm
그리고, 다음과 같이 “sudo yum install -y ” 명령 인수로 지정하여 리포지토리를 인스톨합니다.
$ sudo yum install -y https://download.postgresql.org/pub/repos/yum/reporpms/EL-7-x86_64/pgdg-redhat-repo-latest.noarch.rpm

.... 중간 생략 ....
Installed:
  pgdg-redhat-repo.noarch 0:42.0-17.1

Complete!
사용 가능한 리포지토리를 확인하기
PostgreSQL Yum Repository 설치 후, 사용 가능한 리포지토리에 변화가 있었는지 다음과 같이 “sudo yum repolist enabled” 명령으로 내용을 확인할 수 있습니다. 확인 결과 Base, Extras, Updates 3개의 리포지토리 이외에 PostgresSQL 관련 리포지토리가 추가되었음을 확인할 수 있습니다. 참고로 “sudo yum repolist all“의 결과는 여기를 눌러 확인하십시오.
$ sudo yum repolist enabled
.... 중간 생략 ....
repo id                     status
base/7/x86_64        CentOS-7 - Base                                   10,072
extras/7/x86_64      CentOS-7 - Extras                                    476
pgdg-common/7/x86_64 PostgreSQL common RPMs for RHEL/CentOS 7 - x86_64    299
pgdg10/7/x86_64      PostgreSQL 10 for RHEL/CentOS 7 - x86_64             900
pgdg11/7/x86_64      PostgreSQL 11 for RHEL/CentOS 7 - x86_64             980
pgdg12/7/x86_64      PostgreSQL 12 for RHEL/CentOS 7 - x86_64             546
pgdg13/7/x86_64      PostgreSQL 13 for RHEL/CentOS 7 - x86_64             271
pgdg96/7/x86_64      PostgreSQL 9.6 for RHEL/CentOS 7 - x86_64            873
updates/7/x86_64     CentOS-7 - Updates                                 2,189
repolist: 16,606
pgdg13 레포지토리만 활성, 그 이외는 비활성으로 설정한 뒤 pgdg13 레포지토리의 이용 가능한 패키지 리스트를 확인하는 명령은 다음과 같습니다. 참고로 명령 실행 결과는 여기를 눌러 확인하십시오.
$ sudo yum --disablerepo="*" --enablerepo="pgdg13" list availablePostgreSQL서버 설치하기
PostgreSQL 서버 설치 및 사용이 목적이라면 “sudo yum install -y” 명령으로 postgresql13-server 패키지를 설치합니다. 패키지 postgresql13, postgresql13-libs는 의존 관계를 가지고 있기 때문에 함께 설치됩니다.
$ sudo yum install -y postgresql13-server
.... 중간 생략 ....
Installed:
  postgresql13-server.x86_64 0:13.3-1PGDG.rhel7
Dependency Installed:
  libicu.x86_64 0:50.2-4.el7_7
  postgresql13.x86_64 0:13.3-1PGDG.rhel7
  postgresql13-libs.x86_64 0:13.3-1PGDG.rhel7
Complete!
PostgreSQL 패키지의 설치 장소는 버전마다 다릅니다. 버전 13이면 /usr/pgsql-13에 설치됩니다. 참고로 동일한 환경에 여러 버전을 설치할 수 있습니다.
$ ls /usr/pgsql-13
bin  lib  share
PostgreSQL 서버 설치할 때 PostgreSQL 관리 유저 postgres가 존재하지 않으면 자동 생성합니다. “id” 명령으로 존재 여부를 확인합니다.
$ id postgres
uid=26(postgres) gid=26(postgres) groups=26(postgres)
자동으로 작성된 postgres 유저의 패스워드를 설정합니다.
$ sudo passwd postgres
Changing password for user postgres.
New password:
Retype new password:
passwd: all authentication tokens updated successfully.
PostgreSQL 데이터베이스 클러스터 작성하기
다음 명령으로 PostgreSQL 데이터베이스 클러스터를 작성합니다. log는 /var/lib/pgsql/13/initdb.log에 출력 됩니다. 참고로 initdb를 다시 시작하려면 “/var/lib/pgsql” 의 모든 내용을 삭제하십시오.
postgresql-12-setup 사용 작성하기
$ sudo /usr/pgsql-13/bin/postgresql-13-setup initdb
$ sudo cat /var/lib/pgsql/13/initdb.log
The files belonging to this database system will be owned by user "postgres".
This user must also own the server process.

The database cluster will be initialized with locale "en_US.UTF-8".
The default database encoding has accordingly been set to "UTF8".
The default text search configuration will be set to "english".

Data page checksums are disabled.

fixing permissions on existing directory /var/lib/pgsql/13/data ... ok
creating subdirectories ... ok
selecting dynamic shared memory implementation ... posix
selecting default max_connections ... 100
selecting default shared_buffers ... 128MB
selecting default time zone ... UTC
creating configuration files ... ok
running bootstrap script ... ok
performing post-bootstrap initialization ... ok
syncing data to disk ... ok

Success. You can now start the database server using:

    /usr/pgsql-13/bin/pg_ctl -D /var/lib/pgsql/13/data/ -l logfile start
PGSETUP_INITDB_OPTIONS 지정 postgresql-12-setup 사용 작성하기
또는 root 관리 사용자로 로그인해서 PGSETUP_INITDB_OPTIONS 환경 변수를 다음과 같이 설정하면 기본 encoding을 변경해서 PostgreSQL 데이터베이스 클러스터를 작성할 수도 있습니다.
# export PGSETUP_INITDB_OPTIONS="--encoding=UTF8 --locale=en_US.UTF-8 --lc-collate=en_US.UTF-8 --lc-ctype=en_US.UTF-8"
# /usr/pgsql-13/bin/postgresql-13-setup initdb
# cat /var/lib/pgsql/13/initdb.log
initdb 명령 사용 작성하기
참고로 다음 명령을 사용하여 PostgreSQL 데이터베이스 클러스터를 작성할 수도 있습니다. 기본 설치가 아닌 커스터마이즈 설치를 위해 상세하게 옵션을 지정할 때 사용합니다.
$ sudo su - postgres -c '/usr/pgsql-13/bin/initdb -E UTF8 --locale=C -A scram-sha-256 -W'옵션 설명은 다음과 같습니다.
- -U : 만들 데이터베이스 클러스터의 수퍼 유저 이름
- -A : 인증 방법 지정. ( password, md5, scram-sha-256 중 하나를 지정합니다.)
- -E : 문자 코드 지정
- -W : 새로운 수퍼 유저(postgres)를 위한 암호를 입력하라는 메시지를 표시합니다.
- -D : 데이터베이스 클러스터를 저장하는 디렉토리(절대 경로). 지정되지 않은 경우 환경 변수 PGDATA가 지정됩니다.
서비스 등록 및 시작, 정지, 재기동하기
OS가 기동할 때 PostgreSQL 서비스도 같이 자동으로 기동시키기 위해서 다음 명령으로 시스템 서비스에 등록합니다.
$ sudo systemctl enable postgresql-13
Created symlink from /etc/systemd/system/multi-user.target.wants/postgresql-13.service to /usr/lib/systemd/system/postgresql-13.service.
다음 명령으로 PostgreSQL 서비스를 수동으로 시작합니다.
$ sudo systemctl start postgresql-13PostgreSQL 서비스를 수동으로 재기동하려면 다음 명령을 사용합니다.
$ sudo systemctl restart postgresql-13PostgreSQL 서비스를 수동으로 정지할 때는 다음 명령을 사용합니다.
$ sudo systemctl stop postgresql-13데이터베이스 접속 확인
다음 명령으로 postgres 프로세스를 확인할 수 있습니다. 프로세스가 psql 클라이언트 접속을 기다립니다.
$ sudo su - postgres -c 'ps -o ppid,pid,cmd'
 PPID   PID CMD
    1  2911 /usr/pgsql-13/bin/postmaster -D /var/lib/pgsql/13/data/
 2911  2913 postgres: logger
 2911  2915 postgres: checkpointer
 2911  2916 postgres: background writer
 2911  2917 postgres: walwriter
 2911  2918 postgres: autovacuum launcher
 2911  2919 postgres: stats collector
 2911  2920 postgres: logical replication launcher
 3625  3626 ps -o ppid,pid,cmd
현재 로그인 유저가 관리 유저(postgres)가 아니면 접속할 때 유저 이름과 데이터베이스의 role명이 다르다며 에러 종료합니다.
$ whoami
centos
$ psql -l
psql: error: FATAL:  role "centos" does not exist
다음과 같이 로그인 유저를 관리 유저(postgres)로 변경한 후 데이터베이스에 접속합니다.
$ sudo su - postgres
Last login: Sat May 22 16:32:18 UTC 2021 on pts/0
-bash-4.2$ psql -l
                                  List of databases
   Name    |  Owner   | Encoding |   Collate   |    Ctype    |   Access privileges
-----------+----------+----------+-------------+-------------+-----------------------
 postgres  | postgres | UTF8     | en_US.UTF-8 | en_US.UTF-8 |
 template0 | postgres | UTF8     | en_US.UTF-8 | en_US.UTF-8 | =c/postgres          +
           |          |          |             |             | postgres=CTc/postgres
 template1 | postgres | UTF8     | en_US.UTF-8 | en_US.UTF-8 | =c/postgres          +
           |          |          |             |             | postgres=CTc/postgres
(3 rows)
이것으로 PostgreSQL 서버 설치가 완료되었습니다.